Adjusting a Hydrofoil: How a Hydrofoil Works and How to Make the Right Choices
- Bjorn Verheul
- Feb 28
- 8 min read
Introduction
Hydrofoiling feels like flying above the water. But behind that feeling lies technology. Understanding how a hydrofoil works allows you to fine-tune it perfectly. And correctly setting your foil results in a more efficient, stable, and faster ride. In this article, you'll learn how a hydrofoil works, how to correctly set the mast position, what shims do, the difference between aluminum and carbon masts, and how aspect ratio and wing shape affect your performance. This comprehensive blog post will tell you everything you need to know about the foil.

How does a hydrofoil work?
A hydrofoil works on the same principle as an airplane wing.
When water flows past the front wing, low pressure is created above the wing and higher pressure below. This creates lift. As soon as this lift exceeds your body weight, the board rises out of the water. Control is achieved through the balance between pitch (nose up/down), roll (tilting left/right), and yaw (rotation left/right). The mast acts as the backbone of the system. The stiffer and more torsion-resistant the mast, the more stable your foil will be at higher speeds.
Hydrofoil Adjustment: Mast Position
The position of your foil in the US box rails has a direct influence on your foil behavior.
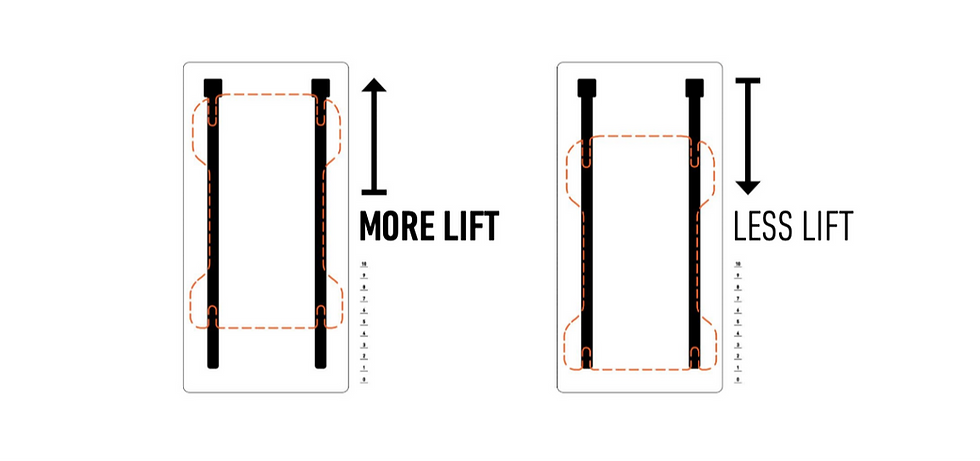
Foil forward:
This provides more lift and faster takeoff, ideal in light winds or for heavier riders. However, it can be more sensitive to pitch.
Foil in the middle:
Beginners position the foil slightly behind the center. This often provides sufficient lift and stability. From this position, you can start fine-tuning.
Foil to the back:
This provides more stability and control at higher speeds, but requires a bit more speed to take off. Beginners position the foil slightly behind the center. Advanced riders fine-tune it each session. Even a small adjustment can make a big difference.
The Roll, Yaw & Pitch Explained
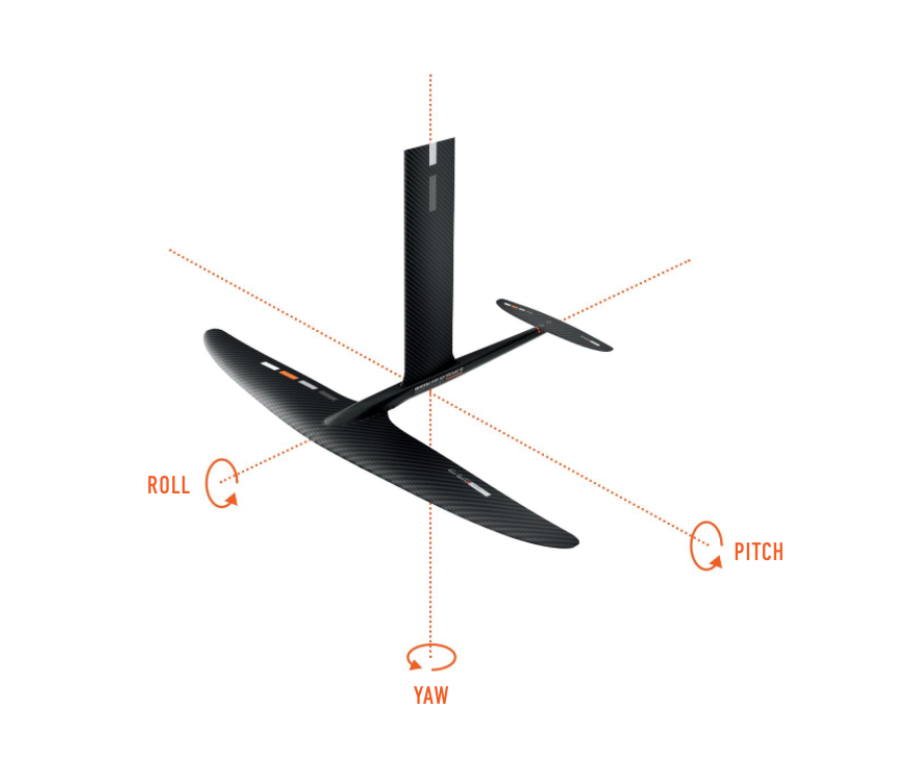
Roll, yaw, and pitch are the three ways a foil can rotate about its axis. These are the same concepts used in aviation.
A hydrofoil can rotate around three axes:
Roll – tilt from left to right
Pitch – tilt from front to back
Yaw – turning to the left or right
We just discussed foil placement in the US track. It was mentioned: Foil forward: This provides more lift and faster takeoff, ideal in light winds or for heavier riders. However, it can become more sensitive in pitch. But what do we mean by "more sensitive in pitch"?
Pitch Up and Down Movement Explained
Ash:
From left to right through the mast
What's happening?
the nose of the board goes up or down
Pitch determines your height above the water. This is the most important movement for beginners to learn to control.
Example for beginners
You get up to speed and feel the board starting to lift.
Lean too far back → nose goes up → you rise too high
Lean too far forward → nose goes down → you hit the water
You can check your pitch mainly with:
Weight distribution between forefoot and hindfoot
Small, gentle corrections
Keep your hips above the center of the board
Many beginners make corrections that are too large. The secret lies in small, smooth adjustments.
Roll – the tilting from left to right
Ash:
From the nose to the tail of your board
What's happening?
One wingtip goes up, the other down
In wing foiling, roll is the motion you use to initiate a turn.
Example for beginners
You're sailing straight ahead and want to turn left . You put a little more pressure on your heels → the board leans to the left → the foil tilts → you make a turn.
So roll is what you feel when you:
Leaning in a bend
Switch from toe side to heel side
Trying to maintain balance in crosswinds
Beginners often notice their foil wobbling. This is usually an uncontrolled roll. As your technique improves, your movements become more subtle and stable.
Yaw – turning without tilting
Ash:
Vertical axis through the mast
What's happening?
The nose turns to the left or right
Yaw is turning your board without leaning.
In practice, yaw often occurs simultaneously with roll during a turn, but you can also feel it when your foil wobbles a bit at low speed. This is also something you'll notice when learning to jibe if you have a weak mast. This makes learning to jibe much more difficult.
Example for beginners
You're trying to sail directly into the wind, but the board keeps turning slightly to the left or right. That's yaw.
A stable foil and sufficient speed help to keep yaw under control.
Short summary so far
We now know the effect of foil placement and the various axes on which the foil can move. These are the effects of the complete foil. In the beginning, you'll mainly have to figure out the foil placement. In practice, it often happens that beginners buy an unsuitable foil, which stagnates the learning process. That's why we always recommend taking lessons and renting equipment before purchasing anything. Now that you know how the foil works as a whole, we'll look at the details in more detail. We'll start with the foils: the shapes of a front wing.
Frontwing shapes in foiling: What changes and why?
Choosing the right front wing can seem overwhelming. Specifications like aspect ratio, chord, wingspan, and thickness sound technical, but in practice, they determine how your foil feels on the water.
Here we clearly explain what changes with different front wing shapes – and more importantly: why that makes a difference when foiling.
Outline: the basic shape of your wing
The outline is the contour of the front wing. Just like on a surfboard, the width, length, and curvature determine how the front wing reacts.

There are roughly two styles:
Rounded outline
A rounder shape feels fluid and forgiving.
Smooth, controlled turns
More grip in the water
Ideal for progression and all-round use
This type of wing feels predictable in carves and helps with controlled turns.
Stretched outline
A more extended form focuses on speed and glide.
More efficiency
More drive in corners
Less forgiving
These wings are popular with experienced riders looking for maximum performance.
Small shape details make the difference
Subtle adjustments in the outline greatly affect the character:
A rounder leading edge improves carving
Slightly pulled back tips increase stability
More surface area at the tips gives stability but reduces maneuverability
A more centered surface improves rail-to-rail response
Aspect Ratio (A/R)
The aspect ratio is the ratio of wingspan to area (wingspan²/area). Simply put: how long and narrow is the wing relative to its area?

Low aspect ratio
Wider and rounder
Lots of lift at low speed
Stable and easy to turn
Perfect for beginners and foil schools.
Medium aspect ratio
Balanced mix of lift, speed and agility
Versatile in use
Suitable for freeride and surfing
High aspect ratio
Long and narrow
Maximum glide and efficiency
Better upwind performance
Higher top speed
Ideal for advanced riders, racing and efficient pumping.
Chord (width of the wing)
The chord is the distance from the leading edge (front) to the trailing edge (back).

Big chord
More lift at low speed
Easier takeoff
Forgiving
More resistance
Ideal for low speeds and easy take-offs.
Small chord
Less lift at low speed
Higher speed possible
More glide
More efficient
A narrower chord requires a little more technique on the takeoff, but rewards with speed and efficiency.
In short: Wide chord = stability and simplicity Narrow chord = speed and efficiency
Wingspan
The wingspan is the tip-to-tip width of the front wing.

Shorter wingspan
Fast, reactive corners
Playful character
Less stability at high speed
Longer wingspan
Bigger, smoother curves
More glide
More stability at speed
Less maneuverable at low speed
In short: Short = playful and loose Long = stable and efficient
Thickness (profile thickness)
Thickness refers to the maximum profile height of the wing.

Thicker profile
More lift at low speed
Take off earlier
More resistance
Lower top speed
Thinner profile
Less resistance
Higher speed
More efficiency
More technical take-off
Interesting detail: thickness often scales with chord size. Smaller wings (for lighter riders or more wind) are usually thinner for efficiency. Larger wings (for heavier riders or less wind) are thicker to generate sufficient lift.
How does everything fit together?
No single specification stands alone. Aspect ratio, chord, wingspan, and thickness all influence each other continuously.
A low aspect ratio with a thick chord feels completely different than a high aspect, narrow and thin wing — even if the total surface area is the same.
Therefore, choosing a front wing is not just about surface area, but about the overall design.
Which foil suits you?
Generally speaking you can stick to the following:
Beginners: lower aspect ratio, slightly wider chord, more stability
All-round freeride: medium aspect ratio, balanced shape
Speed / race / long downwind runs: high aspect, narrow and efficient profile
Want to know which setup best suits your weight, level, and fitness level? Personal advice is always the fastest way to progress.

Aluminum or carbon mast?
Aluminum masts are affordable, durable, and ideal for beginners. They are heavier and less torsionally stiff. Carbon masts are lighter, stiffer, and offer more control at high speed. They are more expensive but deliver maximum performance. Are you sailing under 18 knots? Aluminum is often sufficient. Looking for maximum performance? Then carbon is the logical choice.
What do shims do with a hydrofoil?
Shims adjust the angle of the rear wing. 0° is neutral and offers balanced performance. 0.75° gives more lift and faster takeoff. 1.5° delivers maximum lift but less top speed. More shim means more lift and drag. Less shim means more glide and speed.
Angle of Attack explained
For the real theory enthusiasts, we'll delve a little deeper into the theory and discuss the angle of attack.

Angle of Attack (AoA):
Besides shape, aspect ratio and thickness, there is another crucial factor that determines how a hydrofoil performs: the angle of attack (AoA).
The angle of attack is the angle between:
The chord line of the front wing (from leading edge to trailing edge)
The direction in which the foil moves through the water
Simply put, how “angled” is your wing relative to the water flow?
Why is Angle of Attack so important?
The angle of attack determines how much lift your foil generates.
Small AoA → less lift, less drag, more speed
Larger AoA → more lift, but also more drag
Excessive AoA → stall (loss of lift)
So it's a balance between lift and efficiency.
How do you notice AoA when wing foiling?
Although you don't see the corner directly, you feel it continuously under your feet.
Take-off
When you start pumping or gaining speed:
You shift a little more weight back
The nose rises
The AoA is increasing
The elevator builds up
You rise from the water
That moment when you “break free” is the result of sufficient speed and sufficient angle of attack.
Too much angle of attack
If you lean back too far:
The AoA is getting too big
The water flow detaches from the profile
The foil loses lift
You feel a sudden drop
We call this a stall .
Beginners often confuse this with “too little speed,” when in reality it is often an overly aggressive pitching motion.
Cruising at speed
At higher speeds, you need less AoA to generate the same lift.
That means:
Your attitude becomes more neutral
Your foil feels more efficient
Your resistance decreases
Your glide is getting better
An experienced foiler uses minimum AoA for maximum efficiency.
The Relationship Between Pitch and Angle of Attack
Angle of attack is directly affected by pitch .
More pressure on your back foot → nose up → AoA greater
More pressure on your forefoot → toe down → AoA smaller
That's why pitch control feels so important when learning to foil: you're essentially constantly fine-tuning your angle of attack.
How Foil Design Affects the Angle of Attack
Different front wings react differently to AoA changes:
Thick profiles generate lift faster at low AoA
High aspect wings are more efficient at small AoA
Low aspect wings are more forgiving at greater AoA
Stabilizer setup and shim settings also affect the base AoA of your foil.
Practical tips for beginners
Make small corrections, not big movements
Think about pressure distribution, not about “leaning hard”
Look for a neutral, relaxed posture once you fly
If your foil suddenly drops, check that you were not leaning too far back
Good foil control is essentially controlling your angle of attack.
Conclusion
A hydrofoil isn't a static product, but a system you can adjust to your skill level and conditions. By understanding mast position, shims, aspect ratio, and material selection, you can optimize your setup for maximum control, speed, and progression. That's what Wingxperience stands for: Performance. Control. Progression.
FAQ - Frequently Asked Questions
Which foil do I need if I start wing foiling?
Where should I place the foil?
Why does my nose keep going up?
Do I need to shimmy my foil?


Comments